


Bending basics: Streamlining press brake setup
So often brake setup is long and difficult, but it doesn’t have to be
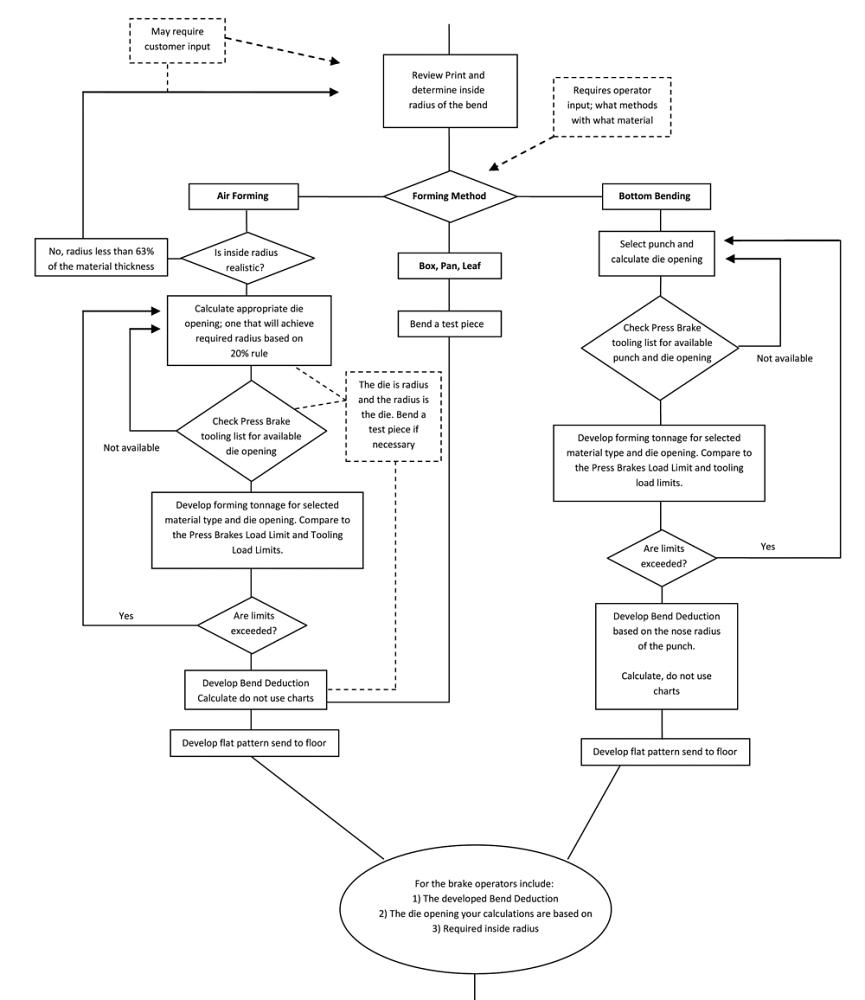
Figure 1
Referring to a flow chart can help ensure that the press
brake technician has the right tools and material to set
up a machine quickly for every job. Copyright 2011
Asma LLC.
Press brake setup is without argument one of the most difficult tasks any precision sheet metal shop faces. With all of the variables—small variations in material thickness within the same gauge, grain direction, bending methods, tooling choices, and the technician’s skill level, to name just a few—it’s no wonder press brake setup often takes far longer than it should.
But it doesn’t have to, and focusing on several key areas can help: selection of tools and forming processes, clear and accessible setup sheets, and ISO documentation.
Tool, Process Selection
If you’re an engineer, head to the shop floor and spend some time talking with your lead personnel in the forming department. Find out what it is that they do. Do they air-form aluminum and bottom-bend steel? This is not a time to judge, just to research what’s going on.
Next, get a list of the shop’s available press brake tools that includes their sizes, angles, styles, and strengths. From this point forward, use that information to lay out and design your parts.
You now can use that information to design parts around the processes that are actually being performed on the shop floor. And because you included the press brake department in your calculations, shop floor personnel should readily accept that you are telling them what tooling to use—a proposition that in the past may have been unacceptable.
Next, refer to something like the forming flow chart shown in Figure 1. This will walk you through the necessary steps to ensure you include the right information on the setup sheet. After reviewing the prints, you need to choose the bending method: air forming; bottom bending; or bending with a leaf, pan, or box brake. (Coining, in which the punch penetrates to a point that’s less than the material thickness, isn’t included. Such bending is unsafe and really shouldn’t be performed anymore.)
Be sure you have the correct data for the project and include it on the setup sheet. Most important, make sure the punch and die combinations used to calculate the inside bend radius and die opening are available. Standardizing here will save you from having to deal with varying part dimensions due to changes in the inside bend radii produced by different die openings or punch radii.
When a job’s setup sheet arrives at the press brake department, it should note only the tooling selection and forming method (which these days is usually air forming). Leave the rest of the setup to the operators.
The Setup Sheet
Even in today’s digital world, you should keep a paper copy of your setup. After all, you might get a new machine that can’t read an existing database, and of course there is a chance you could lose that database altogether. For the press brake operator, setup sheets are a necessary part of life. Figure 2 show one of the best examples of a setup sheet. Why is it good? Let’s look at the individual elements.
The top portion (see Figure 3) contains general information about the customer and the part. The top four boxes, both right and left, include the customer’s information as well as the part name and number. Your in-house information is on the right.
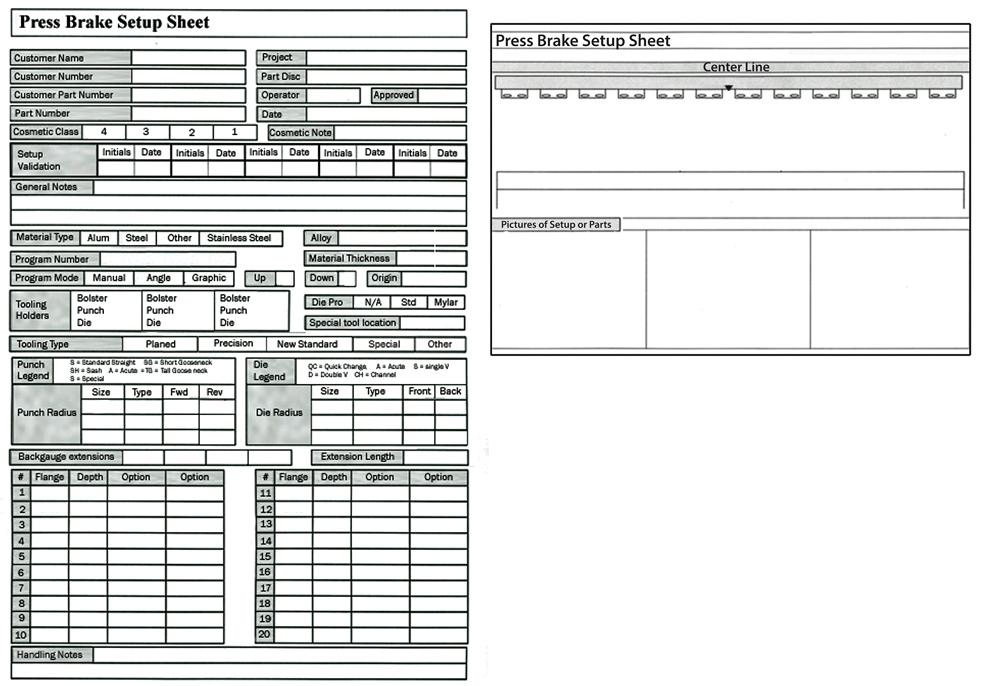
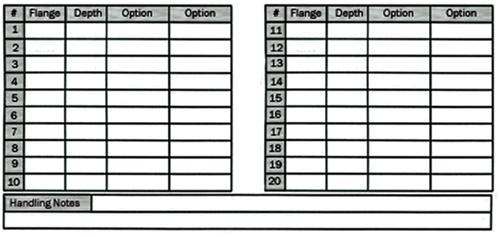
Figure 2
This setup sheet (front and back) gives the operator the
needed information for the job at hand.
Note the Setup Validation line. This is used to validate the setup over time. As each consecutive technician sets up, loads the program, bends the first part, and finds it valid, he initials and dates the line. After three or four runs, that setup is validated; you know it’s good.
The General Notes line allows the engineer to define the method of forming: air forming, bottom bending, or whether the job requires a special tool or other operation.
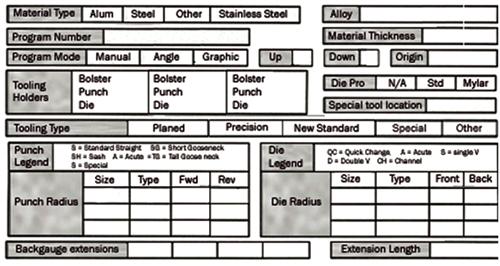
Figure 4 depicts the second section, which lists the material type, alloy and thickness; the CNC program number; the mode of operation; as well as types and styles of toolholders and tooling styles: American planed, precision-ground, or New Standard. Last but not least comes the punch and die data. This is arguably the most important section. It’s where engineering defines the die opening and punch radius—but not the tool orientation, placement, or style; that’s the brake technician’s expertise.
The third section (see Figure 5) includes just a few basic pieces of information about each step in the bend sequence: backgauge location, ram location, and a couple of option boxes. Even though you probably will save the program that holds this basic information to a database, having it on a paper document will help you re-create the setup on a different machine that can’t read the database. At the bottom is a place for any special handling notes: “stack parts between layers of cardboard,” “wrap in paper or box,” and the like.
The information on the right in Figure 2, which can be on a second sheet of paper or on the back of the first, shows a simple drawing of the press brake’s ram and bed. This allows you to show tooling locations along the length of the bed. (This particular setup sheet shows the European-style precision-ground holders in place; you may or may not need to show these.)
Using pictures is a great way to show a difficult setup or a specific detail about the part to be produced—information that might be difficult to explain in writing but easily shown. This can be especially useful in shops employing people who may not speak fluent English.
Not an Absolute
While a necessity, setup sheets should never be used as an absolute. If you air-form, you certainly need to standardize the tooling, but everything shouldn’t be set in stone. When setup sheets are used as an absolute, skills won’t improve, nor will setups.
Instructing everyone to treat setup sheets as immutable can leave operators and technicians with little interest in their work, and their skill levels will remain low. If operators perform a little experimentation, their setups and skills will improve, as will their morale—the byproduct of a little pride of ownership. After all, do any of us do our best when we’re in a “do as you’re told” environment?
Also consider safety. The more skilled your operators are, the safer their setups will be. The press brake is a very dangerous machine and has been responsible for the loss of more than one finger or limb. If operators work from a poor setup sheet, perform poor setups, or work in a “my way or the highway” environment, then the best people leave, and you’re left with less-than-desirable, unengaged employees who in turn perform even worse, more dangerous setups—well, you get the picture.
ISO and Setup Sheets
The International Organization for Standardization, better known as ISO, is an international standard-setting body composed of representatives from various national standards organizations. ISO boils down to a simple statement: I say what I do and I do as I say; and within reason, I am the one who says what it is that I do.
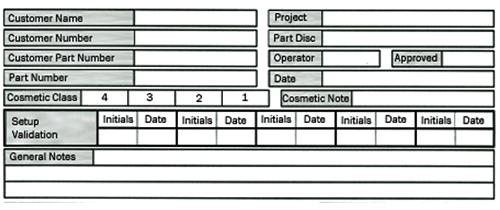
Figure 3
The top portion includes basic job information and, most important, a record of setup validation.
ISO obligations can be very simple or extraordinarily detailed. Of course, documenting a procedure as an ISO obligation doesn’t mean it’s a good procedure. One ISO-certified company wrote into its obligations that once a setup is written, it becomes gospel on the shop floor. Should a technician wish to change the setup per the ISO obligation, he would go to the lead person, who would then need to convince the supervisor, then take that to the account manager, who would then ask the customer for their OK to change the setup—as if the customer understood the nuances of a press brake setup.
Guess what? That didn’t happen. Skill level was low, and so was pay. Nobody cared. It was just too difficult to make a change. When this company ultimately did decide that a certain press brake setup was dangerous, management’s answer was to put up stickers saying that the operator should take care not to get his or her finger crushed between the tooling. Basically, the sticker told operators that yes, this setup is dangerous, and you’re violating OSHA guidelines, but go ahead and just be careful.
Not the wisest of moves.
Although setup sheets are a necessary evil, don’t limit or make them difficult to change and improve upon. When preparing or adjusting your ISO obligations, remember that a cumbersome procedure will over time lead to low morale and quality.
About the Author

About the Publication
subscribe now

The Fabricator is North America's leading magazine for the metal forming and fabricating industry. The magazine delivers the news, technical articles, and case histories that enable fabricators to do their jobs more efficiently. The Fabricator has served the industry since 1970.
start your free subscription- Stay connected from anywhere

Easily access valuable industry resources now with full access to the digital edition of The Fabricator.

Easily access valuable industry resources now with full access to the digital edition of The Welder.

Easily access valuable industry resources now with full access to the digital edition of The Tube and Pipe Journal.

Easily access valuable industry resources now with full access to the digital edition of The Fabricator en Español.
- Podcasting

In this episode of The Fabricator Podcast, Caleb Chamberlain, co-founder and CEO of OSH Cut, discusses his company’s...


