Director of Marketing & Strategy
One of the more common yet difficult jobs in metal fabrication is using portable tools to take down welds and produce a final finish on stainless steel tube or pipe. Sanding the weld down to a No. 3 or No. 4 finish can seem like a daunting task, but taking it one step at a time can make this process much less formidable.
Before getting started, it’s best to consider a few guidelines:
Taking down the weld can be done with a flap disc, fiber disc, or quick-change cloth disc (see Figure 1). The choice depends on the type of grinder and the life expectations of the discs. Flap and fiber discs can be used on electric and pneumatic right-angle grinders, while cloth discs are used on pneumatic-powered, high-speed vertical spindles only.
Flap discs provide the longest life (up to 20 times longer than the others), but fiber and cloth discs have a more aggressive cut rate because of the backup pad’s stiffness.
Stainless steel, like other difficult-to-grind materials, requires the sharpest possible grains and continuous lubrication during the grinding action. For these reasons, the recommended abrasive grain is ceramic alumina with a supersize coating or grinding aid, which serves as a lubricant.
Ceramic alumina has a microfracturing capability that allows for a constant supply of new cutting edges. Zirconia alumina or aluminum oxide also works on stainless steel, but ceramic alumina’s properties provide more efficient grinding—faster cut rates and higher utilization of each grain. Furthermore, the grinding aid slows, and in some cases eliminates, disc loading, resulting in the longest product life.
The starting point for most applications is 36 to 60 grit. The finer the starting grit size, the easier it is to remove the grind lines in the next step.
The critical portion of the second step is to generate a directional scratch that matches the original grain direction. For sheet and plate finishing, the operator has to determine the grain direction; for tube and pipe, the common approach is to grind parallel to the weld seam.
Tool choices include a horizontal-shaft machine, such as a drum sander with a coated abrasive belt; a high-speed pneumatic die grinder with flap wheels; and a pneumatic grinder with nonwoven wheels (see Figure 2). A belt is the first choice for both speed and blending capabilities. The same cut rate and life advantages of ceramic alumina that made it the grain of choice in Step 1 make it the choice in Step
Note that a drum sander is good for straight lengths. When part configuration includes bends, flared ends, and other curved features, a flap wheel is necessary (see Figure 3). At this point the recommendation would be 80 grit or an aluminum oxide nonwoven wheel with coarse grit.
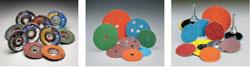
Figure 1: Flap discs (left), fiber discs (middle), and quick-change cloth discs (right) are three choices for the first step in manual finishing—taking down the weld.
For the final step, the tool used in Step 2, outfitted with a nonwoven abrasive, is recommended. Nonwoven belts are a combination of strong synthetic mesh and quality abrasive, bonded by an adhesive. The open construction and cushion effect of nonwoven material enable aggressive cutting action and improved surface finish without loading it.
Aluminum oxide medium belts are recommended for a No. 3 finish; fine belts are recommended for a No. 4 finish on stainless steel.
Blending is achieved by slowing the sander and minimizing the overlap between the weld area and the original grain. As in Step 2, the part shape or dimensions may not allow for the belt sander. In this case, nonwoven wheels can be used in the same abrasive and grit size to produce the required finish.
If the job requires even higher finishes, No. 5 to 8, Step 3 can be adjusted with finer grit sizes of nonwoven media and, in some cases, by changing to silicon carbide. For touchup applications, the same nonwoven abrasives can be used in a hand pad.
The finishing industry uses numbers and letters to define 13 stainless steel surface finishes. The first five, numbered 0 to 2, are mill finishes. The other eight finishes, numbered 3 to 10, are applied by steel producers, toll processors, or fabricators.
No. 0: Hot-rolled and annealed
No. 1: Hot-rolled, annealed, and passivated
No. 2D: Cold-rolled, annealed, pickled, and passivated
No. 2B: Cold-rolled, annealed, pickled, and passivated, with an additional pass through highly polished rollers
No. 2BA: Bright annealed, which is similar to 2B but has an additional step in which the steel is annealed in an oxygen-free atmosphere
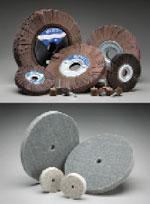
Figure 2: Flap wheels (top) and nonwoven wheels (bottom) are used for the second step, aligning the grain.
No. 3: Coarse
No. 4: Brushed
No. 5: Satin
No. 6: Matte
No. 7: Reflective
No. 8: Mirrorlike
No. 9: Bead blast
No.10: Any of several electropolished or heat-colored surfaces
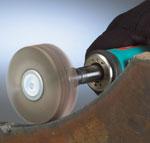
Figure 3: As the name implies, a flap wheel consists of a large number of abrasive flaps. This design conforms to curves, bends, and other nonlinear features..

The Tube and Pipe Journal became the first magazine dedicated to serving the metal tube and pipe industry in 1990. Today, it remains the only North American publication devoted to this industry, and it has become the most trusted source of information for tube and pipe professionals.
start your free subscription
Easily access valuable industry resources now with full access to the digital edition of The Fabricator.

Easily access valuable industry resources now with full access to the digital edition of The Welder.

Easily access valuable industry resources now with full access to the digital edition of The Tube and Pipe Journal.

Easily access valuable industry resources now with full access to the digital edition of The Fabricator en Español.
In this episode of The Fabricator Podcast, Caleb Chamberlain, co-founder and CEO of OSH Cut, discusses his company’s...