


Contributing Writer
Throughout the last 28 years of my tool and die career, I have seen a plethora of dies ranging in size from a 20-station progressive die that you can hold in your hand to single-station dies that are 30 feet long. I have seen tools running as slow as 1 stroke per minute (SPM) and as fast as 1,500 SPM. I have seen dies made from solid carbide and dies made from materials just short of Elmer's glue and sawdust. Presses ranging from one to 50,000 tons, materials being stamped from gold to S-7 tool steel. Wow! What a ride!
I travel a great deal, so I see a lot. Some tools perform flawlessly, while others—well … let's just say they would make good boat anchors. Very simply, a tool's performance is based on many variables and factors. Items such as the press parameters, the cutting and forming lubrication, as well as changes in temperature are a few basic factors that affect stamping process success.
Following are three deadly tool design sins to avoid.
Knowing as much about the metal that you are trying to cut and form is very beneficial. Literally thousands of different types of ferrous and nonferrous metals are available today. Each type of metal has its own special behavioral characteristics. Stamping materials such as titanium and gold is not common.
I usually tell my seminar attendees this: In order to process, design, or troubleshoot sheet metal successfully, you must first think like the metal. For example, if you think like low-carbon, draw-quality steel and are trying to form aluminum, you will have problems. Not that aluminum is bad, it's just different.
If you are processing a part that requires a great deal of stretch or drawability, don't attempt to process it with insufficient data. For example, don't be satisfied with knowing only that the material is 1018 steel. Instead, find out the material's tensile and yield strengths, as well as its elongation percentage and, whenever possible, its average n and r values.
Find out if the metal is coated or prepainted. If it is a nonferrous metal, find out if it is full-hard, dead-soft, or half-hard. Also, if the metal is to be drawn, determine if it is of drawing quality.
Is the material a specialty advanced high-strength steel such as dual-phase or TRIP?
Knowing the material type will help you choose a suitable tool steel to cut and form it. Knowing your metal's characteristics also will help you to determine if it may be necessary to anneal the parts between forming operations.
Higher-strength metals exhibit more springback. Knowing if your metal is high-strength can lead you to add extra stations to compensate for springback issues.
Avoid building common tools to form a wide variety of different metals without changing the die.
In addition, pay close attention to the metal thickness. Thick metal stretches more than thin metal. Why? There is more metal too stretch. It's a volume thing. Nothing is more difficult to stretch or draw than thin, high-strength metal. Thin metal does not resist buckling and wrinkling as well as thicker metals. Thick metal is inherently stiff, so it resists buckling much better. Very deep-drawn parts made from thin, high-strength metal often require multiple drawing operations. To get an idea of what I mean, imagine drawing a sheet of aluminum foil into an oil pan. Ouch!
Making assumptions about a press is a major sin. Just recently I had a client who was attempting to run a progressive die that was designed to deep-draw a stainless steel cup. He encountered major splitting problems. Why? Although the press had adequate tonnage and bed size, its ram speed (velocity) was way too fast for deep-drawing applications. The press was engineered for blanking, not deep drawing. Much to the client's disappointment, the die will never run in that press. The die designer never asked what type of press would house the die. A grave mistake.
You must consider many factors when selecting a press for a die. For example, just because it takes 100 tons to deep-draw a large part doesn't mean that you can safely place a die in any old 100-ton press. Careful consideration must be given to the available tonnage during the stroke. For instance, a 400-ton crank-drive press with an 8-in. stroke may have only 150 tons available 3 in. from the bottom of the stroke. If the part that you are attempting to draw is 3 in. tall, you need enough tonnage to form and control the metal flow 3 in. from the bottom of the stroke. You may not have the available force needed at that point. The possible result? Boom! A broken press.
Pay attention to the ram speed of the press. Draw-link drive, servo, and hydraulic presses are best-suited for deep-drawing applications, while faster presses often are suitable for cutting and bending applications.
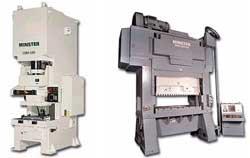
It is the die designer's responsibility to engineer a tool that can perform in the client's press. If the client does not have the proper press for the tool, the designer should inform the client that he is undertaking a great risk by installing it in the press (Figure 1).
CLICK ON IMAGE FOR LARGER VIEW
Figure 2
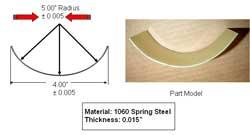
Beware of unrealistic part tolerances.
Tight tolerances require a greater amount of precision to be engineered into the die. Keep in mind that just because a part has been designed with a very tight critical tolerance does not means that the part can be stamped to the specified tolerance. I have seen parts with specified tolerances that would be literally impossible to achieve in a stamping die. Generally speaking, with the exception of dies that resize the metal's thickness, avoid making parts that have tolerances less than the metal's thickness.
Also keep in mind that the incoming metal will differ slightly from coil to coil. Remember, regardless of how well you process the part and how precise the die was built, the incoming metal will not be consistent, and variability in your parts will exist.
Don't make assumptions regarding the part tolerance. Avoid processing parts with unrealistic tolerances (Figure 2).
Watch for critical trim line tolerances. Formed parts with close trim line tolerances usually require trimming the part after the part is completely formed. This adds more stations to your die. In addition, look for surface requirements such as Class 1 or A surfaces. These stringent surface requirements usually inflate the tooling cost and increase the time spent metal finishing the forming die sections.
When sheet metal meets physics, physics always wins. Don't try to defy the physical limitations of the metal that you are forming or cutting.


The Fabricator is North America's leading magazine for the metal forming and fabricating industry. The magazine delivers the news, technical articles, and case histories that enable fabricators to do their jobs more efficiently. The Fabricator has served the industry since 1970.
start your free subscription
Easily access valuable industry resources now with full access to the digital edition of The Fabricator.

Easily access valuable industry resources now with full access to the digital edition of The Welder.

Easily access valuable industry resources now with full access to the digital edition of The Tube and Pipe Journal.

Easily access valuable industry resources now with full access to the digital edition of The Fabricator en Español.
In this episode of The Fabricator Podcast, Caleb Chamberlain, co-founder and CEO of OSH Cut, discusses his company’s...


