


Contributing Writer
Flatness is one of the most difficult part characteristics to achieve in a conventional stamping die. Some of the factors controlling part flatness are:
1. The severity of the steel cutting deformation.
2. The mechanical properties of the sheet material.
3. The incoming flatness of the material or coil.
4. The metal's thickness.
5. The residual stress created in previous operations.
6. The strain levels at various areas within the part.
In most cases in which parts must be flat, initial distortion is created during blanking, piercing, or trimming. During these processes, stress is created, which forms strain planes along the surface of the part. These strain planes are what cause your part to twist, bend, and distort. Therefore, the only realistic way to achieve part flatness is to keep internal part stress to a minimum or to break up the strain planes after they have been formed.
The first step to improving flatness problems is to look at your cutting or piercing operation. If your part flatness requirements include reasonable tolerances, they can be addressed with something as simple as changing the cutting clearance. Although this is not the best way to achieve critical part flatness, it is the most economical way.
The cutting and piercing clearance that is selected affects the amount of internal stress created. Depending on the metal type and clearance between the upper and lower cutting steels, this stress can be significant enough to promote part distortion.
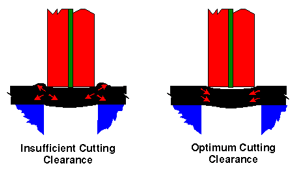 |
| Figure 1: Be sure to leave enough cutting clearance around a pierce punch—it is critical in avoiding plastic deformation. |
Increasing the cutting clearance during the piercing process reduces part stress, mainly because the compressive metal deformation around the pierce punch decreases. When the clearance between the piercing punch and the die button is insufficient, the metal is forced to deform plastically or hump up around the perimeter of the pierce punch. This creates stress in the part. Increasing the clearance reduces the severity of the deformation, thus reducing stress (see Figure 1).
Keep in mind that as you increase cutting clearance, more stress will be introduced to your slug. If the slug is to be saved, blanking operation clearance should be decreased.
A very popular way of achieving part flatness in a progressive die is to use a cut-and-carry process (see Figure 2). A cut and carry process holds the part flat during the cutting process and later ejects it from the carrier strip. In a cut and carry process, the slug produced is the piece part. During the cutting process, the metal is squeezed and held flat between the face of the cutting punch and a high-pressure pad. This pad is powered by a nitrogen cylinder, die-draulic unit, or hydraulic cushion.
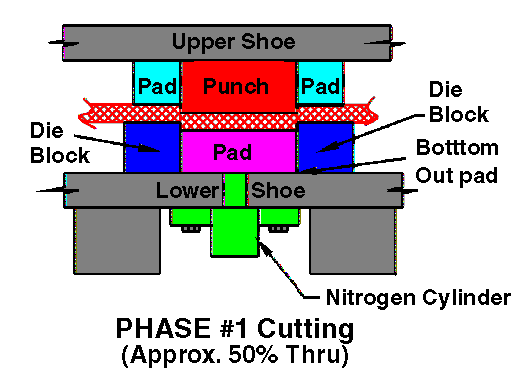
Figure 2:
In the cut-and-carry method, a piece is blanked about halfway through as metal is squeezed
and held flat, then is pushed through with a punch smaller than the cutting punch.
The part is blanked approximately 50 percent of the way through the strip and left in this position. The pressure pad underneath also bottoms out on the die shoe.
The part later is pushed out with a punch that is slightly smaller than the previous cutting punch. It is very important to use a reduced cutting clearance for cut-and-carry operations. This is necessary for two primary reasons—to hold the blank in the carrier strip and to reduce the cutting deformation of the slug, or part.
Selection of the cutting clearance and penetration of the cutting punch are functions of a material's thickness and mechanical properties. However, a good rule of thumb for most applications is to have the cutting clearance about 2 to 4 percent of metal thickness per side and punch penetration approximately 50 percent of the metal's thickness.
After the cutting operation is complete, try to avoid pushing the slug back into the strip, because this may cause unnecessary distortion of the part. The part can be ejected later through the die with an ejection punch that has a slightly smaller profile than the original cutting punch. A rule of thumb is to make the ejector punch 1 percent smaller.
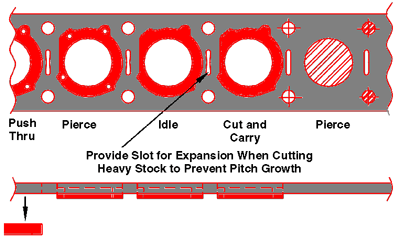 |
| Figure 3: Leaving room for expansion in the stock is critical in the cut and carry method. |
Keep in mind that when you are using thick stock with a reduced cutting clearance, severe plastic deformation may cause strip growth. When you reduce the cutting clearance, it causes metal to move away from the punch, which causes the metal's volume to increase. The growth from a particular punch might only be 0.005 in., but in a progressive die with 30 stations, you have major problems at the end of the line. To help overcome this, expansion slots can be added to void areas of the strip. These void areas allow an area for the metal to flow to, which helps to reduce strip growth (see Figure 3).
This type of operation also allows the cut edge of the part to be burnished fully without fracture. This is highly desirable, especially when you are manufacturing stamped parts such as gears or other items that require full edge contact.
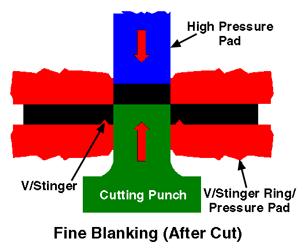
 |
| Figure 4: A high-presure ram pad helps to ensure material flatness in the fineblanking process. |
A fineblanking operation utilizes a special high-pressure pad containing a stinger ring. This stinger ring is a barblike projection that is impaled or coined into the sheet metal surrounding the cutting profile. Its function is to keep the metal from flowing outward plastically when the metal is cut.
Because fineblanking uses little or no cutting clearance, the amount of outward metal flow must be restricted and controlled. Only when the outward metal flow is reduced can a fully sheared cut line be achieved. Much like a cut-and-carry process, a fineblanking operation also holds the blank flat during cutting. However, unlike cut and carry, a fineblanking operation uses a very high-pressure ram pad to hold the metal flat. This ensures maximum blank holding and flatness pressure (see Figure 4).
 |
| Figure 5 |
Stippling the blank, a process that addresses internal stress after it has already been created, utilizes a cross-hatched pattern that is coined into one or both surfaces of the part after all cutting and extensive metal deformation is done. The stipple pattern breaks up internal part stress and destroys the part memory, allowing it to be rehit flat.
The depth of the stipple is relative to metal thickness, the mechanical properties of the material, and the stress that was previously induced. Experimentation may be necessary to achieve the desired results.
There are more ways to hold parts flat. Processes such as grip flow and compound blanking are also very popular. Attempting to make parts flat by using extreme tonnage or coining can ruin a die or press, especially if the equipment is not designed for it.
With the exception of very thick or very soft metal, excessive tonnage generally will lead nowhere. The key element to remember is controlling or breaking up internal part stress.


The Fabricator is North America's leading magazine for the metal forming and fabricating industry. The magazine delivers the news, technical articles, and case histories that enable fabricators to do their jobs more efficiently. The Fabricator has served the industry since 1970.
start your free subscription
Easily access valuable industry resources now with full access to the digital edition of The Fabricator.

Easily access valuable industry resources now with full access to the digital edition of The Welder.

Easily access valuable industry resources now with full access to the digital edition of The Tube and Pipe Journal.

Easily access valuable industry resources now with full access to the digital edition of The Fabricator en Español.
In this episode of The Fabricator Podcast, Caleb Chamberlain, co-founder and CEO of OSH Cut, discusses his company’s...


