


Contributing Writer
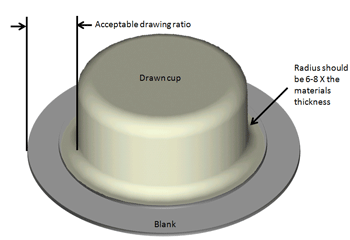
Figure 1
The previous DIEVESTIGATION column discussed design considerations for stamped parts made primarily by stretching the metal rather than drawing. This article discusses design considerations for deep drawing.
The term drawing can be confusing. This is especially true if you’re not a tooling expert. It’s confusing because it has several different definitions:
Deep drawing can be defined as a process used to create a part with a height that is two or more times its minimum part width. For example, if you are making a round drawn cup that is 3 in. in diameter and 1 in. tall, you are not making a deep-drawn part. However, if the cup is 1 in. in diameter and 3 in. tall, it is classified as a deep-drawn part.
Deep drawing often requires more than one drawing process. When more than one drawing process is used, the subsequent operations often are referred to as redrawing or reduction. The draw reduction process frequently is used to produce very deep geometry. Like a single drawing process, redrawing uses both metal flow and tension to achieve the finished result. Certain parts may require as much as 15 or more drawing operations.
Follow these two key principles when designing your deep-drawn part:
1. Whenever possible, design the part with a flange or die entry radius that is about 6 to 8 times the material’s thickness. Doing so typically reduces the forming severity and number of operations required to draw the part (Figure 1).
If the die entry radius is too large, the compressed metal can wrinkle before flowing into the part’s vertical wall. This wrinkled material can increase flow resistance and ultimately cause a split.
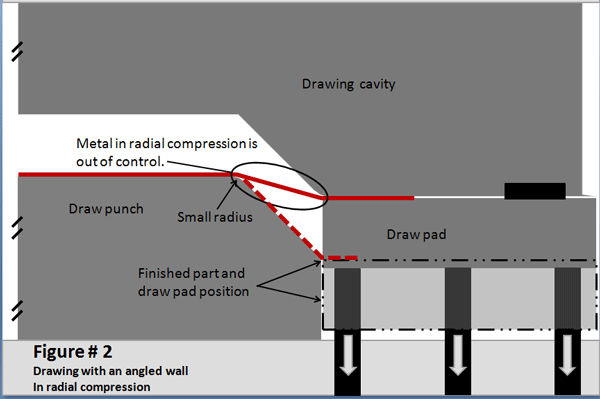
2. Avoid severe draft angles combined with deep forms in areas of the part that are subject to acute radial compression. For example, angled walls in the corners of a deep-drawn square or rectangular shell present a complicated forming issue.
With an angled wall, the draw pad is farther away from the punch contact point. During the drawing process the metal that bridges from the draw pad to the drawing punch is forced into radial compression (Figure 2). Because the metal is not trapped between the die face and draw pad, or the punch and cavity, significant wrinkling can occur.
If the metal is restricted and prevented from flowing, the full depth of the part must be stretched in. More than likely, the metal will split before the part depth can be achieved. Now you are faced with two problems—splitting and wrinkling. If you feed the split, the severity of the wrinkling increases. If you stop the metal from feeding inward, part splitting occurs. Sometimes a wrinkle occurs just below the split. Neither wrinkling nor splitting is permissible. This is why conical-shaped parts, such as the nose cone for propellers, often are produced using a metal spinning process rather than a deep-drawing process.
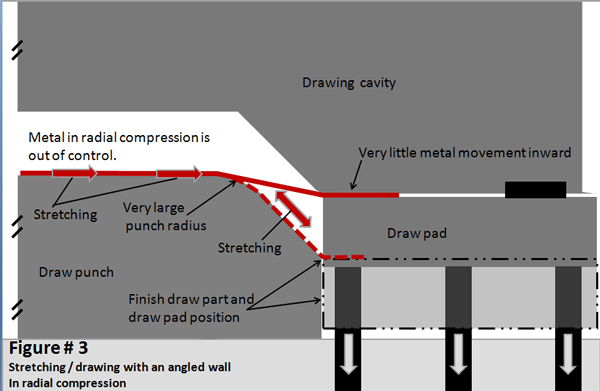
If an angled wall in the radial area is required, use a punch radius as large as permissible. This helps to pull and stretch metal from the portion feeding the upper half of the angled wall (Figure 3).
Designing the part with a vertical wall instead of an angled wall creates a much better forming scenario. However, it must be emphasized this is a true statement only when an acceptable draw ratio (punch-to-blank distance) is present. For this part geometry to be effective, the metal must be able to feed and flow inward.
With a vertical wall, the draw pad can be placed very close to the drawing punch, which leaves very little metal uncontrolled. During the drawing process, the metal trapped between the die face and the draw pad cannot wrinkle. Also, the metal trapped between the draw punch and the cavity does not have the clearance necessary to wrinkle (Figure 4). No wrinkles, no splits, happy customer.
As a guideline, large radii and open-wall angles typically are better for parts with features that are to be formed by stretching. However, for features that are to be drawn, that is not always the case. This is especially true when attempting to draw very thin, low-elongation material, such as thin HSS or aluminum. Using an excessively large punch radius in this case can produce an unacceptable drawing ratio. As the radius gets larger, the distance between the contact point of the punch and the blank’s edge increases. Metal in compression naturally wants to wrinkle. However, if metal is stretched too much to prevent wrinkling, it can split. The radius size must be considered on a case-by-case basis.
I hope this Divestigation has shed some light on the importance of product design as it relates to part formability and the processes and steps needed to make the part. I also hope I haven’t confused you. Trying to explain advanced concepts in writing is like trying to describe the shape of an automotive B pillar to someone over the phone. Remember that these principles are meant to be guidelines only. Hundreds of factors must be considered when making a product design decision. The problem is that each and every design factor often is interactive. One change frequently leads to many changes.


The Fabricator is North America's leading magazine for the metal forming and fabricating industry. The magazine delivers the news, technical articles, and case histories that enable fabricators to do their jobs more efficiently. The Fabricator has served the industry since 1970.
start your free subscription
Easily access valuable industry resources now with full access to the digital edition of The Fabricator.

Easily access valuable industry resources now with full access to the digital edition of The Welder.

Easily access valuable industry resources now with full access to the digital edition of The Tube and Pipe Journal.

Easily access valuable industry resources now with full access to the digital edition of The Fabricator en Español.
In this episode of The Fabricator Podcast, Caleb Chamberlain, co-founder and CEO of OSH Cut, discusses his company’s...


