


Sales Engineer
 |
Just make it work!" they scream. "I don't care how Just make it work!"
As a tooling professional (whether you are a tool- and diemaker, engineer, press operator, or any other member of the team responsible for operating and maintaining that die), you quickly find that "making it work" is subjective.You may discover one or more tool scenarios:
But you also know you have to make it work, and typically, you have to make it work right now.
When you find yourself faced with a die with nasty problems, try using a few collected tricks of the trade to help you get a problem die up and running quickly.
Sometimes you don't know what the die block material is, but determining the tool's ancestry can be a chore in today's global marketplace. As offshore dies come into the North American stamping marketplace, the documentation becomes less and less accurate. Tools labeled as D-2 can turn out to be lesser-quality materials such as 4140 and even cold-rolled steel. Until an easy, very accurate way to test the steel type of a tool is found, mistakes will continue.
Low-quality tool steel can cause several problems in a production environment. It may be too soft or too brittle, it can have cracks and surface flaws, or it may be damaged by heat. Most of these conditions typically are not apparent to the naked eye. Magnification of the area is the only accurate way to pinpoint the problem.
Steel that is too hard may become brittle and chip or crack. Brittleness on the tool surface can be caused by electrical discharge machining (EDM) or improper surface grinding.
To relieve surface brittleness, remove the tool and polish or grind the damaged surface until it's smooth. Then retemper it at 25 degrees F lower than the previous tempering temperature. If you are in doubt about the original heat-treating history, use the lowest recommended tempering temperature for that steel.
If the cracking is not just a surface condition, the block probably is too hard. A new or existing tool can be heat-treated to achieve a lower hardness—a process called underhardening. Hardening steel to 2 to 4 Rockwell hardness (HRC) points less than the optimum hardness will make the tool much more tough and durable. Underhardening is especially helpful on trim steels that chip too often or in piercing and perforating operations.
If the steel appears to be smeared or crushed, then it has inadequate compressive force. The first step is to measure the hardness. (Never assume that a steel is fully hardened, because a lot of things can go wrong during heat treating.) If the hardness is in the optimal range for that steel, then you must either reduce the force produced or increase the hardness. Increasing the hardness of a steel beyond its optimal range may work for a short time, but it will lead to problems later.
D-2, for example, becomes brittle past 60 HRC. Upgrading to a better tool steel can solve this problem. Most tool steel suppliers sell brands of modified D-2 that are durable up to 62 or 63 HRC. Another good general-purpose steel is M-2. The M series, called high-speed steel (HSS), was designed to be hard and very heat tolerant for use in drills and taps. M-2 can be hardened safely up to 62 to 64 HRC and still offer good toughness.
Two of the biggest challenges facing metal formers today are the decreasing use of petroleum-based lubricants and the increasing use of stainless steel.
Reducing friction is one of the keys to successful forming, and lubricants make a big impact on how much friction is generated in the forming process. However, regulations have forced some fabricators to change lubricants, and they've experienced production problems as a result.
Stainless steel contains a lot of chrome, and so do most tool steels. The chrome in the work material often attempts to weld itself to the chrome in the tool, causing galling.
Tool coatings can increase tool surface hardness and decrease friction, allowing metal to flow more smoothly. They serve as an alternative to lubricants and provide a permanent barrier between the tool and the work material, reducing galling.
Coatings for trimming, blanking, and piercing dies take many forms, from soft, low-friction molybdenum-disulfide to high-friction thermal sprays. The key is to match the coating type to the application.
 |
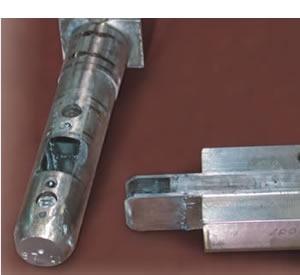
Metal's microsurface is surprisingly rough, even when it appears smooth to the naked eye (see Figure 1). Melting, heat treating, cutting, and grinding can leave hills, pits, craters, holes, scratches, and cracks in the steel substrate. All these imperfections increase metal flow resistance during part forming, which causes friction, heat buildup, galling, and tool wear. The better the finish, the fewer problems you will have.
Most tooling users polish a tool only when it has a problem, such as to remove gall, and then put it back in service. Instead, polish a tool to achieve a mirror finish and then try to keep it in that condition as a part of regular maintenance (see Figure 2). It's not easy or fun, but it can be a real productivity enhancement.
For proper polishing, start with the proper equipment:
If the block is galled or severely scratched, start with the abrasive wheel—and go easy! Use the polishing stones, rubbing by hand in the direction of the material flow, starting with a 200 to 300 grit and working progressively finer to a 900-grit stone. Continually use the mineral spirits to keep the stones clean and moist, and use a grinding wheel to shape the stone to fit the contour of the workpiece.
Use an electric or air grinder with a soft felt bob and a very small dab of diamond paste to finish the tool to a mirror finish. You won't need a mirror finish everywhere, but it makes a huge difference on radius sections.
Once the radius finish is complete, transition that mirror finish to a B and then to a C finish evenly across the rest of the working area of the tool.
Sometimes metal forming operations create enough severe stress to overwhelm the hardened tool steel. This is common if the metal is thinned or coined and is typical with the inside corners of a rectangular draw. It also can occur if the die is bottomed to set against springback.
Instead of fighting this problem every week or month, just eliminate it. The use of inserts is a quick, simple, and economical solution, and with today's EDMs, it's also easy.
First, choose a proper replacement steel, such as M-2, M-4, or modified D-2, and determine where you need the extra hardness. Inserts should be about half the original wall thickness and deep enough to cover the entire depth of the draw.If you are going to coat the insert, then leave some grind stock material on the areas with critical sizes. When the block is coated, you can go back and grind the nonworking areas exactly to fit the insert pocket.
Make sure you polish the insert while it is in the block. Polishing each part separately could result in taped edges, creating a mark on the part or an area for galling to begin.
Usually you would use plastic only as a last-resort lubricator, but with tighter and tighter tolerances and less effective lubricants, it's possible you may need it for use in a production pinch. Plastic garbage bags have been used by toolmakers for years. The intention is to introduce a slippery membrane between the tooling and work material to reduce friction and encourage metal flow (see Figure 3).
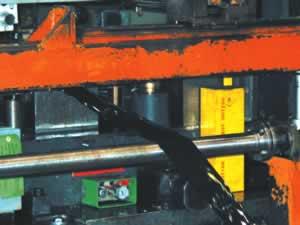 |
| Figure 3 Usually you would use plastic only as a last-resort lubricator, but with tighter and tighter tolerances and less effective lubricants, it's possible you may need it for use in a production pinch. The intention is to introduce a slippery membrane between the tooling and work material to reduce friction and encourage metal flow. |
You can use plastic to make more metal flow in specific corners, or on one side as a way to determine the height and location of draw beads or pad pressure in tryout. Some parts require that extra advantage to even run production, and several companies have rigged a simple stand and electric motor to feed a roll of plastic into the die with the material.
Lubricant application is a technical issue, and every situation will have specific demands and need individual assessment. Just looking at your die is not always enough to know if you are applying lubrication as effectively as possible. For some operations, spraying lubricant from outside the die might be a good choice, while others might require application of lubricant directly to the coil or blank. An application specialist can help you decide which method is right for you.
The next time they scream "Just make it work!" remember these tricks of the trade and apply them to some of your stickier situations, preferably with a new replacement tool at your disposal. All of these tips have actually worked and might for you as well. But like any good solution, the keys are to determine the correct application and experience.
Steve Chamberlain is business development manager and Rodney Hewitt is a sales engineer with TD Center®, an ArvinMeritor Technology, 2020 15th St., Columbus, IN 47201, 877-832-3687 or 812-378-1675, fax 812-378-1591, arvintd@arvin.com, www.arvintd.com.

The Fabricator is North America's leading magazine for the metal forming and fabricating industry. The magazine delivers the news, technical articles, and case histories that enable fabricators to do their jobs more efficiently. The Fabricator has served the industry since 1970.
start your free subscription
Easily access valuable industry resources now with full access to the digital edition of The Fabricator.

Easily access valuable industry resources now with full access to the digital edition of The Welder.

Easily access valuable industry resources now with full access to the digital edition of The Tube and Pipe Journal.

Easily access valuable industry resources now with full access to the digital edition of The Fabricator en Español.
In this episode of The Fabricator Podcast, Caleb Chamberlain, co-founder and CEO of OSH Cut, discusses his company’s...


