CEng
- FMA
- The Fabricator
- FABTECH
- Canadian Metalworking
Categories
- Additive Manufacturing
- Aluminum Welding
- Arc Welding
- Assembly and Joining
- Automation and Robotics
- Bending and Forming
- Consumables
- Cutting and Weld Prep
- Electric Vehicles
- En Español
- Finishing
- Hydroforming
- Laser Cutting
- Laser Welding
- Machining
- Manufacturing Software
- Materials Handling
- Metals/Materials
- Oxyfuel Cutting
- Plasma Cutting
- Power Tools
- Punching and Other Holemaking
- Roll Forming
- Safety
- Sawing
- Shearing
- Shop Management
- Testing and Measuring
- Tube and Pipe Fabrication
- Tube and Pipe Production
- Waterjet Cutting
Industry Directory
Webcasts
Podcasts
FAB 40
Advertise
Subscribe
Account Login
Search
Quality inspections
Ensuring a topnotch weld inspection program
- By Tony Anderson
- July 10, 2007
- Article
- Testing and Measuring
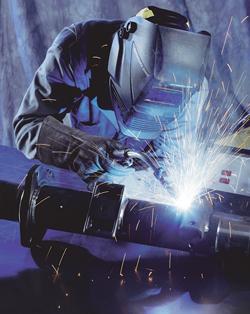
Ensuring that welders follow specific procedures is a crucial step in the overall welding quality system.
There are a number of reasons to inspect a weld, the most fundamental of which is to determine whether its quality is good enough for its intended application. To evaluate the quality of a weld, it is necessary to have a form of measurement to compare its characteristics and a qualified individual to perform the evaluation. It is not practical to evaluate quality without some form of specified acceptance criteria. It's also not practical for a person who is not well-versed in the necessary procedures to perform this task.
Evaluation of weld characteristics includes the size of the weld and the presence of discontinuities. The size of a weld can be extremely important, as it often correlates directly to strength and associated performance. Undersized welds may not withstand stresses applied during service, and oversized welds can produce stress concentrations or contribute to the potential for distortion of a welded component.
Uncovering weld discontinuities also is important because imperfections within or adjacent the weld, depending on their size or location, may prevent the weld from meeting its intended function. When discontinuities are an unacceptable size or in an unacceptable location, they are called welding defects, and they can cause premature weld failure by reducing strength or producing stress concentrations within the welded component.
Determining Weld Quality
Weld quality acceptance criteria can originate from a number of sources. The welding fabrication drawing or blueprint provides weld sizes and other welding dimensional requirements such as length and location. These dimensional requirements are established through design calculations or are taken from proven designs that meet the performance requirements of the welded connection.
The number of acceptable and unacceptable weld discontinuities for welding inspection usually is obtained from welding codes and standards. Welding codes and standards have been developed for many types of welding fabrication applications. It is important to choose a welding standard intended for use within the particular industry or application in which you are involved.
Weld Inspector Responsibilities
Welding inspection requires a knowledge of weld drawings, symbols, joint design, procedures, code and standard requirements, and inspection and testing techniques. For this reason, many welding codes and standards require that the welding inspector be formally qualified, or have the necessary knowledge and experience to conduct the inspection.
Weld inspection is only as good as the person running the tests. Here are a few things that a welding inspector should know and tasks he should be able to perform:
- Welder Performance and Welding Procedure Qualification. Specific procedures must be followed to qualify welders and welding procedures. The qualification process is an integral part of the overall welding quality system, and the welding inspector often is required to coordinate and verify these types of qualification tests.
These qualifications typically involve producing welded samples representative of the welds that will be used in production welding. These welded samples usually are required to be tested after completion. Radiographic, microetching, guided bends, transverse tension, and nick-break fracture are some of the tests that are used. The test results must meet or exceed the minimum requirements as stipulated in the welding code or standard before the procedure can be qualified.
- Visual Inspection. This is often the easiest, least expensive, and most effective method of welding inspection for many applications if performed correctly. The welding inspector must be capable of identifying all of the different welding discontinuities during visual inspection. He also must be able to evaluate, in terms of the relevant welding code or standard, the
significance of identified discontinuities to determine whether to accept or reject them during testing and production.
A welding inspector with good eyesight can be trained relatively quickly by a competent instructor and can prove to be a major asset to the welding quality system (good vision is obviously essential for visual inspection).
- Surface Crack Detection. A welding inspector sometimes is required to conduct weld testing by surface crack detection methods. He also may have to evaluate the test results of these testing methods. The inspector should understand testing methods, such as liquid penetrant and magnetic particle inspection. Additionally, he must know how the tests are used and what they will
find.
- Radiographic and Ultrasonic Weld Inspection. These two inspection methods are in a group known as nondestructive testing (NDT). These inspection methods are used to examine the internal structure of the weld to establish the weld's integrity, without destroying the welded component. The welding inspector may be required to understand this type of testing and be competent in
the interpretation of the results. Radiographic and ultrasonic weld inspection are the two most common methods of NDT used to detect discontinuities within the internal structure of welds. The obvious advantage of both methods is their ability to help establish the weld's internal integrity without destroying the welded component.
Radiographic testing makes use of X-rays produced by an X-ray tube or gamma rays produced by a radioactive isotope. The basic principle of radiographic inspection is the same as that for medical radiography. Penetrating radiation is passed through a solid object, in this case a weld, onto a photographic film, resulting in an image of the object's internal structure. The amount of energy absorbed by the object depends on its thickness and density. Energy not absorbed by the object will cause exposure of the radiographic film. These areas will be dark when the film is developed. Areas of the film exposed to less energy remain lighter.
Therefore, areas of the weld where the thickness has been changed by discontinuities, such as porosity or cracks, will appear as dark outlines on the film. Inclusions of low density, such as slag, will appear as dark areas on the film, while inclusions of high density, such as tungsten, will appear as light areas. All discontinuities are detected by viewing shape and variation in density of the processed film.
Ultrasonic testing makes use of mechanical vibrations similar to sound waves but of higher frequency. A beam of ultrasonic energy is directed into the weld to be tested. This beam travels through the weld with insignificant loss, except when it is intercepted and reflected by a discontinuity. The ultrasonic contact pulse reflection technique is used. This system uses a transducer, which changes electrical energy into mechanical energy. The transducer is excited by a high-frequency voltage, which causes a crystal to vibrate mechanically. The crystal probe becomes the source of ultrasonic mechanical vibration.
These vibrations are transmitted into the test piece through a coupling fluid, usually a film of oil, called a couplant. When the pulse of ultrasonic waves strikes a discontinuity in the test piece, it is reflected back to its point of origin. Thus, the energy returns to the transducer. The transducer now serves as a receiver for the reflected energy. The initial signal or main bang, the returned echoes from the discontinuities, and the echo of the rear surface of the test piece are all displayed by a trace on the screen of a cathode-ray oscilloscope.
- Destructive Weld Testing. Destructive methods to establish weld integrity or performance include sectioning, bending, or breaking the welded component and evaluating various mechanical or physical characteristics. Some of these tests are the guided bend test, macroetch test, reduced section tensile test, fracture test, and Charpy V-notch impact test. These tests are used
during welding procedure or welder performance qualification testing. The welding inspector often is required to conduct, supervise, or evaluate these testing methods.
- Interpretation of Welding Details and Weld Symbols. The welding inspector should be competent in the ability to read engineering and manufacturing drawings, and be able to interpret all details and symbols that provide information about the welding requirements.
By looking at only some of the welding inspector's functions, it is easy to see that the welding inspector can have many responsibilities. These duties generally change from one engineering or manufacturing environment to another. However, the welding inspector's primary job is to help coordinate the welding quality control operations within the organization.
One of the main ingredients of a successful welding quality control system is the establishment, introduction, and control of a sound welding inspection program. A program can be established only after completing an evaluation of the weld quality requirements or acceptance criteria, acquiring knowledge of the inspection and testing methods, and using properly qualified and experienced welding inspectors.
About the Author
Tony Anderson
411 S. Ebenezer Road
Florence, SC 29501
800-372-2123
About the Publication
Related Companies
subscribe now

The Tube and Pipe Journal became the first magazine dedicated to serving the metal tube and pipe industry in 1990. Today, it remains the only North American publication devoted to this industry, and it has become the most trusted source of information for tube and pipe professionals.
start your free subscription- Stay connected from anywhere

Easily access valuable industry resources now with full access to the digital edition of The Fabricator.

Easily access valuable industry resources now with full access to the digital edition of The Welder.

Easily access valuable industry resources now with full access to the digital edition of The Tube and Pipe Journal.
- Podcasting
- Podcast:
- The Fabricator Podcast
- Published:
- 04/16/2024
- Running Time:
- 63:29
In this episode of The Fabricator Podcast, Caleb Chamberlain, co-founder and CEO of OSH Cut, discusses his company’s...
- Trending Articles
Fabricator achieves extraordinary with simple approach
Team Industries names director of advanced technology and manufacturing

New trails, old-school values for Precision Tube Laser

Orbital tube welding webinar to be held April 23
Blades designed for cutting medium metals
- Industry Events
16th Annual Safety Conference
- April 30 - May 1, 2024
- Elgin,
Pipe and Tube Conference
- May 21 - 22, 2024
- Omaha, NE
World-Class Roll Forming Workshop
- June 5 - 6, 2024
- Louisville, KY
Advanced Laser Application Workshop
- June 25 - 27, 2024
- Novi, MI


