Contributing Writer
- FMA
- The Fabricator
- FABTECH
- Canadian Metalworking
Categories
- Additive Manufacturing
- Aluminum Welding
- Arc Welding
- Assembly and Joining
- Automation and Robotics
- Bending and Forming
- Consumables
- Cutting and Weld Prep
- Electric Vehicles
- En Español
- Finishing
- Hydroforming
- Laser Cutting
- Laser Welding
- Machining
- Manufacturing Software
- Materials Handling
- Metals/Materials
- Oxyfuel Cutting
- Plasma Cutting
- Power Tools
- Punching and Other Holemaking
- Roll Forming
- Safety
- Sawing
- Shearing
- Shop Management
- Testing and Measuring
- Tube and Pipe Fabrication
- Tube and Pipe Production
- Waterjet Cutting
Industry Directory
Webcasts
Podcasts
FAB 40
Advertise
Subscribe
Account Login
Search
Producing quality ASTM A249 and ASME SA 249 pressure tubes
- By Frank Fenton
- March 26, 2001
- Article
- Tube and Pipe Production
Producing quality ASTM A249 and ASME SA249 pressure tubes takes more than just applying a stencil to the product. It requires a manufacturing process and a quality system that not only provide an excellent weld, but also condition the weld through proper cold working (forging) and heat treating (annealing) processes so that it closely approximates the structure and properties of the base metal. Only then will the tube have the proper corrosion resistance, stability at temperature, and mechanical properties needed for the most demanding applications.
Only fusion welding processes should be used to produce high-quality stainless, duplex, and nickel-alloy pressure tubing that will be used in demanding or critical applications.
Processes: A Closer Look
Fusion processes generate a molten puddle of metal that wets two edges of steel and is allowed to solidify to create a single weldment. Gas tungsten arc welding (GTAW), which often is referred to as tungsten inert gas (TIG) welding, is the most frequently used process. Plasma arc welding (PAW) also is used and often is abbreviated as plasma welding.
A less common process is laser beam welding (LBW), which uses light energy to create a molten puddle and the resultant weldment. GTAW and plasma welding are the most forgiving of the common welding methods and can produce an excellent-quality weld most easily.
The comparatively small weld puddle created by laser beam welding makes it difficult to achieve a robust manufacturing process. The strip-forming process and weld joint configuration must be very precise, and this often requires strip edge preparation.
Cold working (forging) the weld area is required by ASTM and ASME welded pressure tube specifications. The tube must be forged on the inside as well as the outside to achieve the correct properties.
A weld is a casting with a dendritic structure, which should be recrystallized to the equi-axed grain structure of the base metal.
Figure 1is a photomicrograph of a laser-welded 316L tube. The tube has not been forged or annealed. Note the as-cast structure of the weld compared to the base material.
Both sufficient cold work and proper annealing are necessary to complete the recrystallization process. Annealing often is done on the tube mill and in a hydrogen atmosphere, which reduces surface oxide films and heat tint from welding. The result is a solution-annealed, recrystallized weld and a clean tube that forms a naturally occurring passive surface oxide film as soon as it leaves the annealer and is exposed to oxygen in the atmosphere.
An offline hydrogen atmosphere bright annealer can be used for alloys or specifications that require special anneal cycles.
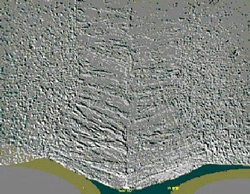
Figure 1Laser welding can yield an as-cast structure in a pipe's weld seam that is quite unlike that of the base material.
Figure 2shows photomicrographs of a properly welded, forged, and annealed tube section. Note that the crystalline structure of the weld is very nearly the same as that of the base metal.
Quality Control
Quality control inspection and testing of tubing should be extensive and can be categorized as nondestructive tests, mechanical tests, or corrosion tests. ASME and ASTM pressure tubing specifications require that either a hydrostatic pressure test or a nondestructive electric test be performed on every length of tubing produced.
Nondestructive and Mechanical Testing. In the nondestructive eddy current tests performed at the author's company, the tube is checked for imperfections and marked with an ink spray where the defect is noted. Detectable defects can be rooted in raw material problems, such as laminations or other flaws in the strip, or problems with the manufacturing process, such as weld penetration or integrity or forging. All mill operators should be trained and certified to ASNT SNTC1A Level 1 or higher in eddy current nondestructive test techniques.
Dimensional inspection is performed online at the mill to ensure conformance to ASTM, ASME, company, or customer requirements, including dimensional tolerance of the tube outside diameter (OD), wall thickness, and length. Equipment used ranges from tape measures to laser micrometers.
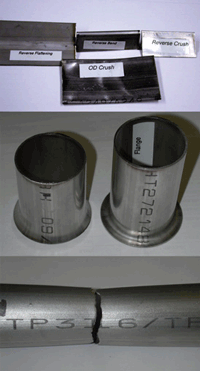
ASTM and ASME pressure tube specifications require destructive testing of random tube samples at designated intervals - - for example, every 1,500 feet (450 meters) - - of each production lot. These required mechanical manipulation tests include flattening (a flare test for seamless tube), flange, and reverse bend tests (see Figure 3). These tests are performed on samples that have welds in a longitudinal orientation. Conscientious suppliers may also do these tests with the weld in a transverse orientation as an added assurance.
In addition, room-temperature tensile and hardness tests are required to evaluate the material properties of the tube and to provide assurance of conformance to pressure vessel design criteria.
Corrosion Testing. A customer may request corrosion testing to evaluate intergranular corrosion resistance, to discover susceptibility to sensitization in service, to measure weld decay properties relative to the base/parent material, or to determine susceptibility to specific or general corrosion attack in a particular environment.
It is important to remember that each type of corrosion test is designed to give some indication of an alloys or alloy family's suitability for a specific application environment and that a particular test may not be appropriate to a particular alloy or application. Therefore, fabricators and producers should be careful when specifying corrosion testing requirements.
For example, the ASTM A249-S7 weld decay test is considered widely to be a reliable corrosion test, but, in reality, the acid used in the test applies to less than 1 percent of real-life operational environments. Other tests, such as ASTM A262 practices A & E, may be far more practical for testing general corrosion.
Figure 4is a scanning electron microscope image of a weld decay test, ASTM A249-S7, performed on a laser-welded 304L tube. Note the weld has been attacked less than the base metal, resulting in a weld decay ratio of 0.84. The ratio is the change in the weld thickness divided by the change in the base material thickness. In this example, the weld was attacked less than the base metal during the test.
Raw material specifications are an important factor in achieving a high-quality welded tube. Physical properties of the strip, as well as its chemistry, are specified and controlled tightly to ensure a quality tube. For example, small additions of sulfur have been known to improve weldability, but excessive amounts may harm the ductility and formability of the product.
In conclusion, making a good-quality pressure tube starts with a well-specified raw material. It also requires a good fusion-type weld, cold work of the weld area, heat treatment, and, of course, close dimensional control of the forming and finishing processes. Last but not least, testing methods must be topnotch to ensure a top-quality product.
About the Author
Frank Fenton
2505 Foster Avenue
Janesville, WI 53547-0389
800-367-7284
About the Publication
Related Companies
subscribe now
The Tube and Pipe Journal became the first magazine dedicated to serving the metal tube and pipe industry in 1990. Today, it remains the only North American publication devoted to this industry, and it has become the most trusted source of information for tube and pipe professionals.
start your free subscription- Stay connected from anywhere

Easily access valuable industry resources now with full access to the digital edition of The Fabricator.

Easily access valuable industry resources now with full access to the digital edition of The Welder.

Easily access valuable industry resources now with full access to the digital edition of The Tube and Pipe Journal.
- Podcasting
- Podcast:
- The Fabricator Podcast
- Published:
- 04/16/2024
- Running Time:
- 63:29
In this episode of The Fabricator Podcast, Caleb Chamberlain, co-founder and CEO of OSH Cut, discusses his company’s...
- Trending Articles
Zekelman Industries to invest $120 million in Arkansas expansion

3D laser tube cutting system available in 3, 4, or 5 kW
Corrosion-inhibiting coating can be peeled off after use
Brushless copper tubing cutter adjusts to ODs up to 2-1/8 in.
HGG Profiling Equipment names area sales manager

- Industry Events
16th Annual Safety Conference
- April 30 - May 1, 2024
- Elgin,
Pipe and Tube Conference
- May 21 - 22, 2024
- Omaha, NE
World-Class Roll Forming Workshop
- June 5 - 6, 2024
- Louisville, KY
Advanced Laser Application Workshop
- June 25 - 27, 2024
- Novi, MI


