Technical Sales Manager
- FMA
- The Fabricator
- FABTECH
- Canadian Metalworking
Categories
- Additive Manufacturing
- Aluminum Welding
- Arc Welding
- Assembly and Joining
- Automation and Robotics
- Bending and Forming
- Consumables
- Cutting and Weld Prep
- Electric Vehicles
- En Español
- Finishing
- Hydroforming
- Laser Cutting
- Laser Welding
- Machining
- Manufacturing Software
- Materials Handling
- Metals/Materials
- Oxyfuel Cutting
- Plasma Cutting
- Power Tools
- Punching and Other Holemaking
- Roll Forming
- Safety
- Sawing
- Shearing
- Shop Management
- Testing and Measuring
- Tube and Pipe Fabrication
- Tube and Pipe Production
- Waterjet Cutting
Industry Directory
Webcasts
Podcasts
FAB 40
Advertise
Subscribe
Account Login
Search
Understanding and selecting a material verification technology
XRF, LIBS, and OES techniques vary in portability, applicability, processing speed
- By James Stachowiak
- November 26, 2019
- Article
- Shop Management
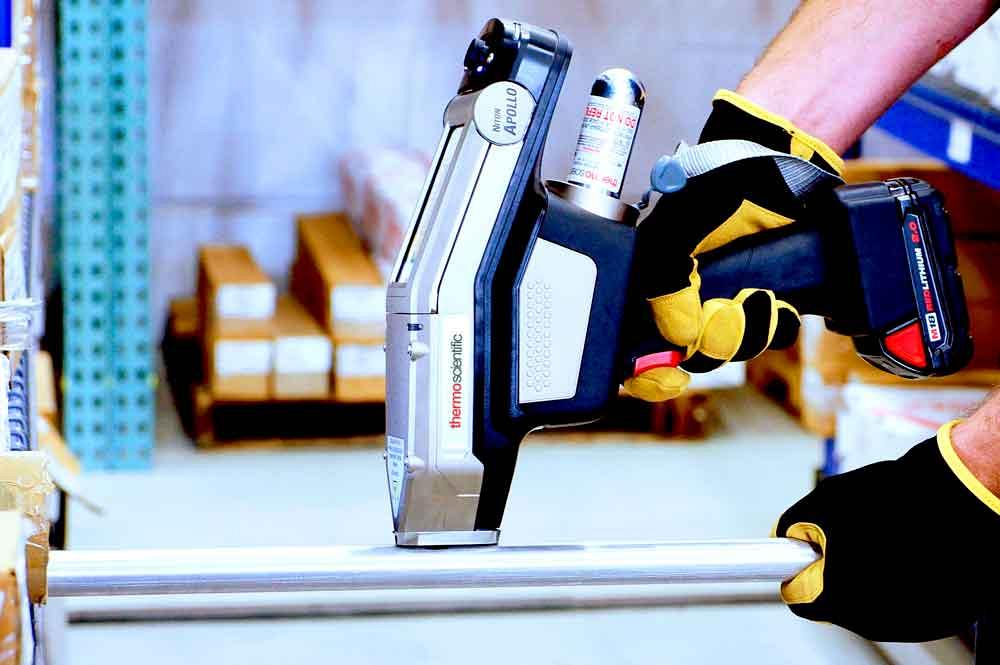
When a shipment of raw material shows up at a fabricator’s receiving dock, is reading the paperwork enough to identify the material? Maybe it is, and maybe it isn’t. Using a portable alloy ID tool is a quick way to verify the metals’ chemical composition. Thermo Fisher Scientific
On any given day, a typical fabrication shop deals with a handful of materials—carbon steels, stainless steels, aluminum alloys, maybe even magnesium from time to time. The accompanying paperwork identifies the material, but how does a fabricator determine if it really received what it ordered? In many cases, it would be beneficial to determine if the metal shipped matches the material test report (MTR). To do this without sending the material to a testing lab, fabricators can use elemental analysis devices.
Elemental analysis technology has come a long way from the days when metal fabricators had to rely on expensive, time-consuming laboratory tests or rudimentary spark or acid testing for material verification. Technological advancements enable portable instruments to carry out analytical processes, meaning laboratory-grade elemental analysis now can be done in seconds right on the shop floor. This capability helps mitigate risks and greatly enhances productivity.
It can be difficult to differentiate between the techniques available—X-ray fluorescence (XRF), laser-induced breakdown spectroscopy (LIBS), and optical emission spectroscopy (OES)—and to determine which one is optimal for a given application.
How They Work
XRF, a nondestructive test, irradiates a metal sample with high-energy X-rays produced by a miniature X-ray tube in the instrument. This causes atoms in the sample to emit secondary (or fluorescent) X-rays that are unique to the elements present in the sample. The instrument detector measures and analyzes the secondary X-rays to determine their chemical identity and their concentration in the metal under test. This capability makes XRF useful for both qualitative and quantitative analysis of material composition.
OES instruments send a high-voltage electrical pulse to excite atoms in a sample. The sample then discharges an arc spark that can be measured and analyzed by a spectrometer in the OES unit. From there the OES system determines the chemical composition of the sample being tested.
LIBS analyzers ablate the surface of the sample with a highly focused laser, which produces a plasma of excited atoms and ions. As these atoms begin to decay to their ground states, they emit wavelengths of light that are unique to each element, which are analyzed by a spectrometer in the LIBS device. As with XRF, LIBS analysis can be used for both quantitative and qualitative measurements.
OES and LIBS are minimally destructive. They leave a minute burn mark on the sample.
How They Get Around
Metal fabricators should keep several considerations in mind when choosing a technology, including portability, speed, and ease of use.
Portability can have a substantial impact on productivity. Fortunately, both LIBS and XRF analyzers are lightweight and hand-held. This means analysis can be conducted easily in nearly any location in a shop or a warehouse, even in difficult-to-reach areas. OES is a mobile technology, but it isn’t hand-held. It requires a push cart that can be hard to maneuver in confined work areas. Today’s most advanced LIBS analyzers weigh as little as 6 lbs. (2.9 kg), while a mobile OES can weigh up to 80 lbs. (36 kg).
Concerning speed of use, the main factors involve instrument setup and maintenance, sample preparation, and analysis speed.
Of the three technologies, XRF is the easiest to use. It is a point-and-shoot device that doesn’t require daily setup or maintenance. LIBS setup is relatively minimal, requiring a two-step process that takes about 10 minutes. Daily setup of OES requires several steps and takes anywhere from 15 to 20 minutes to complete. LIBS and OES instruments require regular cleaning.
Sample preparation is required when using OES and LIBS. Trace amounts of contaminants, such as grease, paint, or even oxidation, can interfere with the test and yield unreliable results. Sample preparation involves cleaning and grinding a testing area on the metal, normally 1 square inch. Alternatively, XRF rarely requires any sample preparation at all.
Depending on the material being tested, advanced LIBS and OES analyzers can test most samples in about 10 seconds. This includes material in which the carbon content is of interest.
An XRF analyzer, for most materials, can give an identification and valid chemistry composition for many alloy types in three to five seconds. However, this does not include carbon analysis, and the analysis time could increase slightly for other light elements present in the alloy. The difference between several seconds adds up when the fabricator considers that several readings or multiple samples (or several readings of several samples) may be necessary, thus demonstrating why choosing the right technology is critical for the operator’s specific application.
Application Considerations
Metal fabricators should think about more than just productivity when choosing an elemental analyzer. A key consideration is matching the analytical capabilities of the technology with the application.
Low-carbon Metals. LIBS is extremely useful for differentiating among various alloys and quantifying carbon concentrations in carbon steels, low-alloy steels, and stainless steels, including L-grade stainless steels (which indicates low carbon). LIBS also can detect aluminum, chromium, copper, iron, manganese, molybdenum, nickel, silicon, titanium, vanadium, tungsten, carbon equivalency, and pseudo-elements.
New Aluminum and Magnesium Alloys. New lightweight grades of aluminum and magnesium alloys are now being used in automotive manufacturing to make cars more fuel-efficient. Automotive frames and components are manufactured from specific alloy grades that have tightly controlled specifications for alloying elements. The material properties are so specific that even slight variations from the specification can render the parts defective, so elemental analyzers are essential for material verification of these finished components.
The introduction of silicon drift detector (SDD) technology into hand-held XRF instruments has produced significant performance improvements over traditional XRF capabilities, enabling them to identify these alloy types positively. It’s worth noting that some LIBS devices on the market today are also capable of analyzing light elements like aluminum, while the more advanced units are dedicated to carbon content analysis instead. Aside from OES, LIBS is the only analytical technique capable of detecting carbon, even down to low levels.
When considering both LIBS and XRF in this application, it’s important to remember that while LIBS is the faster of the two for analyzing aluminum alloys, XRF has the ability to analyze a wide range of alloy types nondestructively.
Aerospace Applications. XRF and LIBS are complementary techniques that can provide analysis and verification necessary for the full range of aerospace alloys. In aerospace manufacturing, parts must be made with the precise alloy according to the engineering specifications. This is necessary to ensure they exhibit high strength and high corrosion resistance at the higher temperatures where they are put into use.
Chemistry, Grade, and Coating Thickness. XRF not only provides quick chemistry and grade verification of incoming raw materials and final products, but it also can be used for compositional analysis and thickness measurements of alloy coatings.
In aerospace manufacturing, for example, this technology can analyze the coatings on engine parts and other components, which is necessary to help protect against short-term and long-term damage from demanding use at high temperatures. This capability can be used to ensure quality control and that expensive coating material isn’t being wasted or underapplied.
Trust but Verify
As the industry continues to globalize, many fabricators are increasingly purchasing material from overseas and from new vendors they have not worked with previously. Inexperienced or unreliable suppliers sometimes try to cut costs by not performing positive material identification or by using an outside testing lab to verify the material they ship out. Unfortunately, MTRs are not always accurate, so a “trust but verify” approach is necessary to confirm the alloy’s chemical makeup.
In such situations, analytical technology comes into play. By performing due diligence, fabricators can be sure to protect their reputation and business by performing these on-site tests themselves.
James Stachowiak is technical sales manager for Thermo Fisher Scientific, 168 Third Ave., Waltham, MA 02451, 800-678-5599, corporate.thermofisher.com.
About the Author
Related Companies
subscribe now

The Fabricator is North America's leading magazine for the metal forming and fabricating industry. The magazine delivers the news, technical articles, and case histories that enable fabricators to do their jobs more efficiently. The Fabricator has served the industry since 1970.
start your free subscription- Stay connected from anywhere

Easily access valuable industry resources now with full access to the digital edition of The Fabricator.

Easily access valuable industry resources now with full access to the digital edition of The Welder.

Easily access valuable industry resources now with full access to the digital edition of The Tube and Pipe Journal.
- Podcasting
- Podcast:
- The Fabricator Podcast
- Published:
- 04/30/2024
- Running Time:
- 53:00
Seth Feldman of Iowa-based Wertzbaugher Services joins The Fabricator Podcast to offer his take as a Gen Zer...
- Trending Articles
JM Steel triples capacity for solar energy projects at Pennsylvania facility

Fabricating favorite childhood memories

How laser and TIG welding coexist in the modern job shop

Robotic welding sets up small-batch manufacturer for future growth

Ultra Tool and Manufacturing adds 2D laser system
- Industry Events
Pipe and Tube Conference
- May 21 - 22, 2024
- Omaha, NE
World-Class Roll Forming Workshop
- June 5 - 6, 2024
- Louisville, KY
Advanced Laser Application Workshop
- June 25 - 27, 2024
- Novi, MI
Precision Press Brake Certificate Course
- July 31 - August 1, 2024
- Elgin,


